Labubu cake designs are taking over social media and bakeries worldwide. When my friend Emma showed me a labubu birthday cake at a local bakery, I knew I had to master this adorable character design. These whimsical cakes featuring the mischievous character from “The Monsters” series aren’t just desserts – they’re edible art that brings pure joy to celebrations. From baskin robbins labubu cake designs to DIY versions, this guide teaches you everything needed to create your own trending labubu cake.
Table of Contents
The Labubu Cake Phenomenon
Last month, I watched my niece’s eyes absolutely light up when she spotted a labubu cake design at her friend’s birthday party. The pure excitement and wonder on her face reminded me why I fell in love with baking in the first place – it’s about creating moments of pure happiness. That’s when I realized there’s something genuinely magical about these character cakes that goes far beyond following trendy social media posts. The labubu doll phenomenon has captured hearts worldwide with its distinctive pointed ears, signature toothy grin, and endearingly mischievous expression, making it absolutely perfect inspiration for cake decorating adventures.
What Makes Labubu Perfect for Cakes
Creating a successful labubu cake starts with understanding what makes this character so visually distinctive and emotionally appealing. The original labubu character, brilliantly designed by Hong Kong artist Kasing Lung, features several key elements that translate beautifully into three-dimensional cake form. Those iconic pointed ears create an instantly recognizable silhouette that’s surprisingly approachable to shape with basic cake pieces and fondant. What I love most about this design is how forgiving it is – even slightly lopsided ears add to the character’s authentic, handmade charm.
The character’s remarkably wide smile with prominently visible teeth adds that distinctive personality that makes people instinctively smile back before taking their first bite. I’ve found that using crisp white fondant or carefully piped royal icing for the teeth creates the perfect contrast against whatever face color you choose. The smile should genuinely stretch from ear to ear – this exaggerated expression is what separates a good labubu cake from a great one.
Moreover, labubu’s simple yet expressive features make it accessible for all skill levels. Unlike complex character cakes requiring advanced techniques, the labubu cake design focuses on basic shapes and bold features. Furthermore, the character’s fuzzy texture translates perfectly to textured buttercream techniques, while various color variations give creative freedom to match any party theme.
Why Everyone’s Creating This Viral Cake
The labubu cake explosion isn’t just about social media trends – it’s about genuine joy these cakes bring. When I first attempted my labubu cake topper design, I discovered the process is incredibly therapeutic and rewarding. The character’s forgiving features mean even imperfect attempts look adorable.
Social media has spread labubu cake designs worldwide, with TikTok and Instagram filled with creative bakers sharing unique takes. However, what drives the trend is how these cakes make people feel – there’s something joyful about a cake that grins back at you. The accessibility of tutorials and simple design elements have democratized character cake making, encouraging home bakers to try their hand at creative designs.
Essential Labubu Cake Design Elements
After creating dozens of character cakes, I’ve learned that successful labubu cake designs depend on nailing essential features that make this character instantly recognizable. Focus on core elements rather than overwhelming details for maximum impact.
Key Features Every Labubu Cake Needs
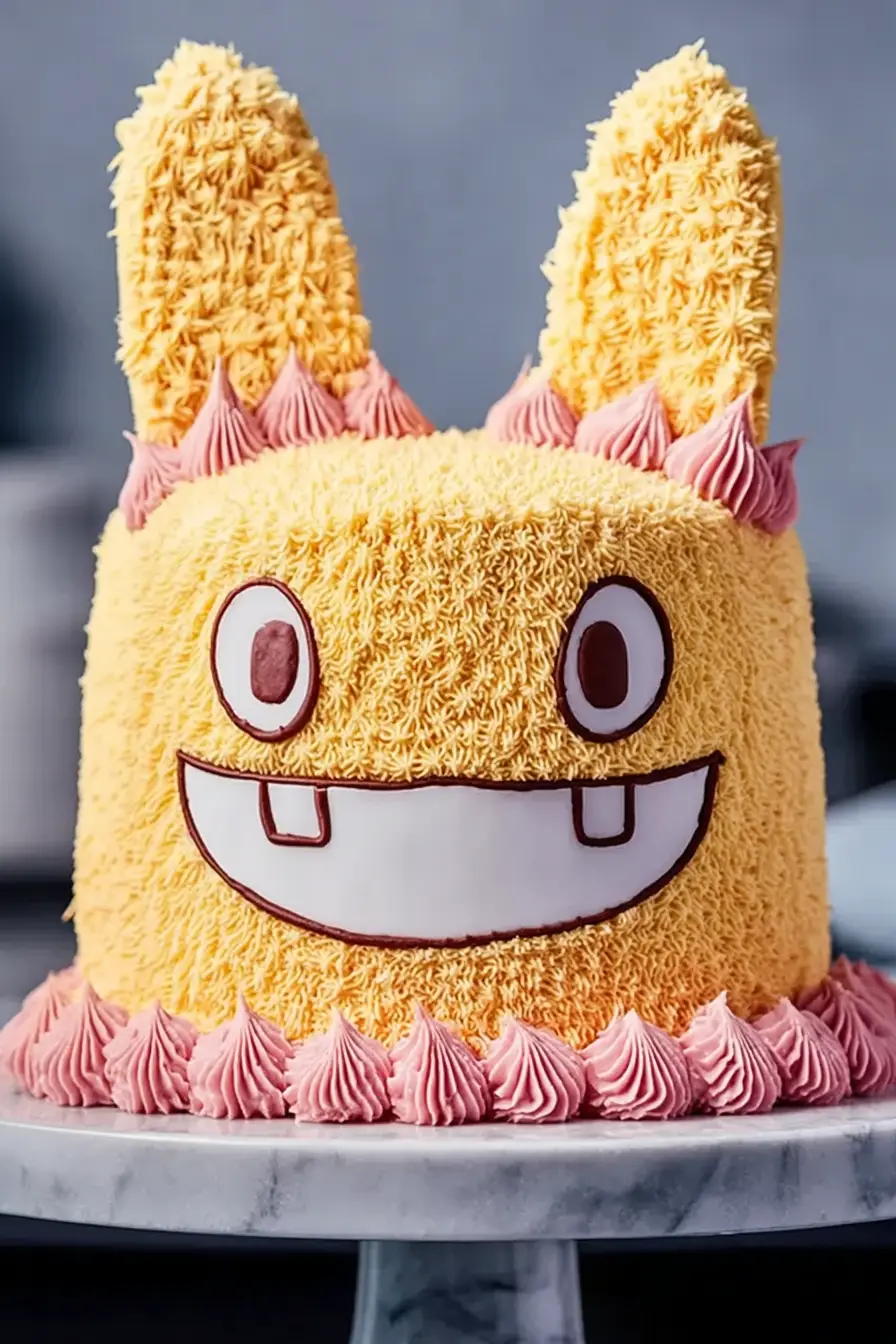
Three essential features immediately signal “Labubu” to viewers. First, those distinctive pointed ears are non-negotiable – they transform a regular round cake into an instantly recognizable character. I shape these using cake pieces or modeling chocolate, positioning them at slight angles for that playful expression.
Next, master the signature wide grin with visible teeth that gives Labubu its mischievous personality. Use white fondant or royal icing for teeth, creating perfect contrast against the face color. The smile should be genuinely wide – Labubu grins ear to ear.
Third, create large, expressive eyes that convey mischievous but loveable personality. Use black fondant circles with white highlights, positioning them asymmetrically for authenticity. Don’t forget the fuzzy texture using textured buttercream techniques with forks or specialized piping tips.
Pro Decorating Tip
Work in a cool environment to prevent buttercream from becoming too soft. If your buttercream starts melting, chill the cake for 15 minutes before continuing with decorating details.
Tools and Supplies for Success
Creating professional-looking labubu cakes doesn’t require expensive specialty equipment, but having the right basic tools makes the entire process infinitely smoother and more enjoyable. After years of experimenting with character cakes, I’ve discovered that success comes from smart tool choices rather than expensive gadgets.
Essential supplies include standard 6-inch round cake pans (perfect for achieving those compact, adorable proportions), a reliable offset spatula for smooth buttercream application, and a bench scraper for creating clean, professional-looking sides. Quality food coloring gels are absolutely worth the investment – they provide vibrant colors without affecting your buttercream’s consistency like liquid versions can. You’ll also need fondant in white, black, and your chosen character color, along with basic shaping tools. Even household items like toothpicks, small knives, and plastic spoons work wonderfully for creating details.
Don’t underestimate the importance of having a sturdy cake board and proper storage containers. A decorated cake board that complements your labubu cake design elevates the entire presentation, transforming your creation from homemade treat to bakery-worthy masterpiece. Consider investing in a small kitchen torch for any finishing touches, but remember that creativity and patience matter far more than expensive equipment.
Consider a sturdy cake board for presentation, similar to techniques I use for my Oreo dirt cake recipe. Most importantly, bring creativity and willingness to experiment – like perfecting my slutty brownies, creating perfect labubu cakes improves with practice.
Complete Labubu Cake Recipe and Instructions
This carefully tested recipe creates a moist, delicious vanilla base that’s perfectly balanced for supporting decorative elements while delivering outstanding flavor. After experimenting with numerous formulations and getting feedback from family taste-testers (who were wonderfully patient with my trial-and-error phase), this version strikes the ideal balance between structural integrity, flavor, and workability for character cake decorating.
Ingredients
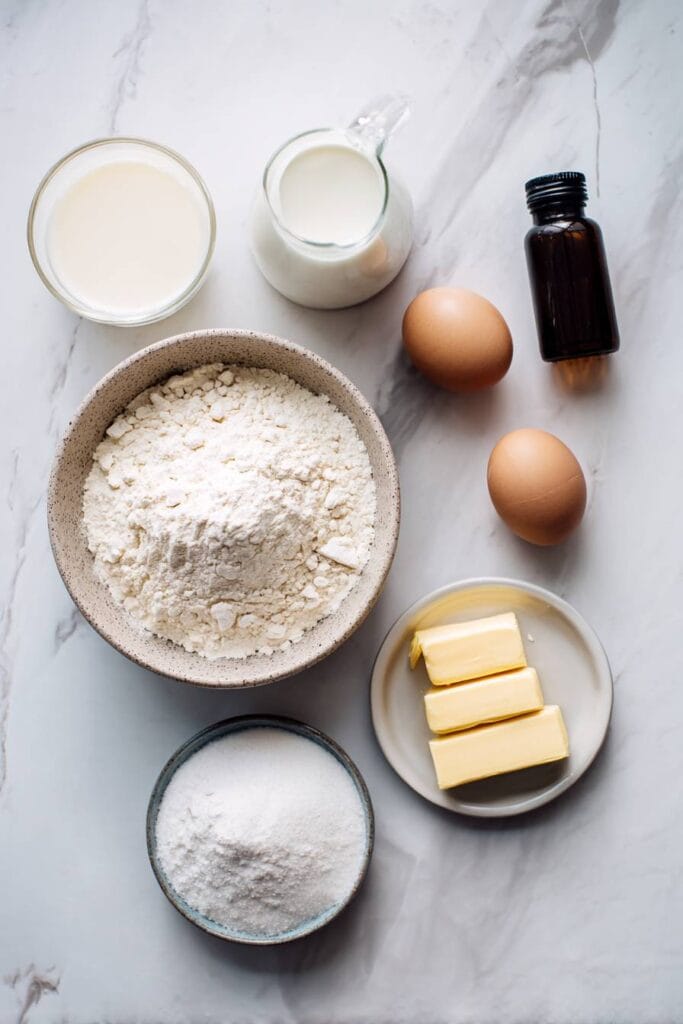
Using high-quality ingredients makes a noticeable difference in both taste and texture. Room temperature ingredients blend more easily, creating a smoother batter and more tender final cake.
Cake Ingredients:
- 2½ cups all-purpose flour – sifted for smoothness
- 1¾ cups granulated sugar – room temperature
- ¾ cup unsalted butter – softened
- 3 large eggs – room temperature
- 1¼ cups whole milk – room temperature
- 2½ teaspoons baking powder – fresh
- 2 teaspoons vanilla extract – pure preferred
- ½ teaspoon salt
Buttercream Frosting:
- 1 cup unsalted butter – softened
- 4 cups powdered sugar – sifted
- 3-4 tablespoons heavy cream
- 1 teaspoon vanilla extract
- Yellow food coloring gel – as needed

How to Make Labubu Cake
Baking Instructions:
- Preheat oven to 350°F (175°C). Grease two 6-inch pans and line with parchment paper.
- Whisk flour, baking powder, and salt in medium bowl.
- Beat butter and sugar 4-5 minutes until fluffy. Add eggs one at a time, then vanilla.
- Alternate flour mixture and milk, beginning and ending with flour. Mix until just combined.
- Divide batter between pans. Bake 25-30 minutes until toothpick comes out clean.
- Cool 10 minutes in pans, then turn out onto wire racks completely.

Perfect Cake Texture Secret
All ingredients should be at room temperature for the best mixing results. Cold eggs and milk can cause the batter to curdle, affecting your cake’s final texture.
Decorating Steps:
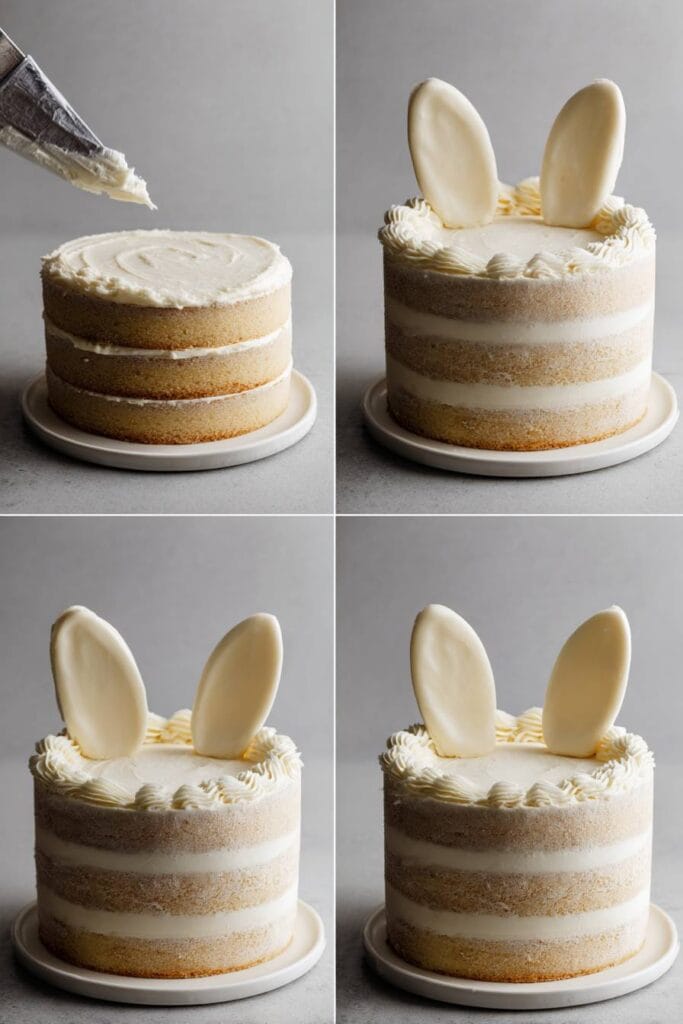
- Level cake tops with a serrated knife for perfectly even stacking. Place bottom layer on serving plate and spread a generous layer of buttercream between layers for stability and moisture.
- Apply thin crumb coat of buttercream all over the cake to seal in any loose crumbs. This step is crucial for achieving that smooth, professional finish. Chill 30 minutes until firm.
- Apply your chosen colored buttercream in smooth, even layers using an offset spatula. Work patiently, building up the color gradually for the most even coverage.
- Create and attach cake piece ears using additional buttercream as “glue.” Position them at slight angles rather than perfectly straight for that authentic, playful Labubu expression.
- Lightly mark facial feature placement with a toothpick before committing to final details. This prevents mistakes and helps achieve balanced, symmetrical proportions.
- Create the signature wide smile using black fondant or piped icing, then carefully add individual white fondant teeth. Take your time with this step – the smile is what brings your labubu cake to life.
- Add black fondant circle eyes with tiny white fondant highlights positioned asymmetrically for maximum character authenticity.
- Apply fuzzy texture using a fork or texture tool across the entire surface, creating that distinctive Labubu fur appearance that makes the character so endearing.
Character Cake Success
Remember that Labubu’s charm comes from its slightly imperfect, handmade aesthetic. Don’t stress about making everything perfectly symmetrical – the character’s appeal lies in its quirky, authentic look!
Serving and Storage Tips
Present your labubu cake on decorated cake board that complements the design. Store covered at room temperature for 2 days or refrigerated for up to 5 days. For best results, bring to room temperature before serving.
Perfect Presentation Ideas
Instagram-Worthy Photos
Natural lighting showcases Labubu’s character features best. Position your cake near a window during daylight hours for that perfect social media shot that’ll get everyone asking for your recipe!
Surround your labubu cake with themed decorations or other character elements. Consider creating a labubu cake topper scene with small fondant accessories. Photography tip: natural lighting showcases the character features best, similar to how I photograph my Christmas tree cheesecake recipe.
Make-Ahead Tips
Bake cake layers up to 3 days ahead and wrap tightly. Freeze layers up to 1 month. Make buttercream 2 days ahead and store refrigerated. Bring all components to room temperature before decorating for best results, just like when preparing my Boston cream pie cheesecake.
FAQ
What made Labubu so expensive?
Labubu dolls are expensive due to their limited edition releases, high-quality materials, and collectible nature. The original Pop Mart figures are produced in limited quantities, creating scarcity that drives up prices in resale markets.
Is Labubu a luxury brand?
While Labubu itself isn’t a luxury brand, it’s positioned as a premium collectible toy. The character was created by artist Kasing Lung and produced by Pop Mart, making it more of an art collectible than a traditional toy.
What is so special about Labubu?
Labubu’s appeal lies in its unique design combining cute and slightly mischievous elements. The character’s pointy ears, wide grin with visible teeth, and expressive eyes create an instantly recognizable and endearing appearance that resonates across age groups.
Is Labubu a Chinese brand?
Labubu was created by Hong Kong artist Kasing Lung and is produced by Chinese company Pop Mart. While the manufacturing is Chinese, the character’s design draws inspiration from Nordic mythology and European elf legends.
Final Thoughts
Creating your own labubu cake represents so much more than simply following the latest social media trend – it’s about embracing creativity, celebrating the joy of handmade treats, and bringing genuine smiles to the people you care about most. Throughout my journey of perfecting this recipe and technique, I’ve discovered that the process itself is just as rewarding as the final result. There’s something deeply satisfying about transforming basic cake ingredients into an edible character that captures hearts and creates lasting memories.
This trending character cake phenomenon isn’t just about following crazes – it’s about the fundamental human desire to create something beautiful and meaningful with our own hands. Whether you’re crafting a labubu birthday cake for a special celebration, experimenting with labubu cake design techniques for your own enjoyment, or simply wanting to surprise someone with an unexpected treat, remember that practice makes perfect and every attempt teaches you something valuable.
The beauty of the labubu cake lies in its forgiving nature and endless possibilities for personalization. Don’t be afraid to experiment with different colors, add your own creative touches, or adapt the design to match specific celebration themes. Some of my favorite variations have come from happy accidents or spontaneous creative decisions during the decorating process. Start with this foundational recipe and technique, then let your imagination guide you toward creating your own unique interpretation of this beloved character that’ll have everyone asking for both your recipe and decorating secrets.
I’d love to see your own labubu cake creations! Feel free to share your photos and variations on my Pinterest where I regularly pin cake decorating inspiration and behind-the-scenes baking tips. There’s nothing more rewarding than seeing how each baker adds their own personal touch to make these character cakes uniquely their own.

Labubu Cake Recipe
Equipment
- 6-inch round cake pans
- Electric mixer
- Offset spatula
- Bench scraper
Ingredients
Cake Ingredients
- 2½ cups all-purpose flour sifted for smoothness
- 1¾ cups granulated sugar room temperature
- ¾ cup unsalted butter softened
- 3 large eggs room temperature
- 1¼ cups whole milk room temperature
- 2½ teaspoons baking powder fresh
- 2 teaspoons vanilla extract pure preferred
- ½ teaspoon salt
Buttercream Frosting
- 1 cup unsalted butter softened
- 4 cups powdered sugar sifted
- 3-4 tablespoons heavy cream
- 1 teaspoon vanilla extract
- Yellow food coloring gel as needed
Instructions
- Preheat oven to 350°F (175°C). Grease two 6-inch pans and line with parchment paper.
- Whisk flour, baking powder, and salt in medium bowl.
- Beat butter and sugar 4-5 minutes until fluffy. Add eggs one at a time, then vanilla.
- Alternate flour mixture and milk, beginning and ending with flour. Mix until just combined.
- Divide batter between pans. Bake 25-30 minutes until toothpick comes out clean.
- Cool 10 minutes in pans, then turn out onto wire racks completely.
- Level cake tops and stack with buttercream between layers.
- Apply thin crumb coat of buttercream. Chill 30 minutes.
- Apply colored buttercream smoothly using offset spatula.
- Create and attach cake piece ears using buttercream. Position at slight angles.
- Mark facial feature placement with toothpick for balanced proportions.
- Create wide smile using black fondant, then add individual white fondant teeth.
- Add black fondant circle eyes with tiny white fondant highlights positioned asymmetrically.
- Apply fuzzy texture using fork or texture tool across entire surface for authentic Labubu appearance.
Notes
More Delicious Cake Recipes
If you enjoyed making this labubu cake, try these other trending cake recipes from our collection:
- Italian Cream Cake – Perfect for special occasions
- Gooey Coconut Cake Recipe – Moist and tropical flavors
- Brownie Cheesecake Recipe – Chocolate lover’s dream
- Churro Cheesecake Recipe – Unique fusion dessert
- Blackberry Cheesecake Recipe – Fresh fruit elegance

